Problem: Misplaced Component
To deal with a misplaced component we need to:
- Identify any misplaced components
- Remove them
- Put them into the correct spots
If you already know you have a misplaced component, skip down the next section.
Finding Misplaced Components
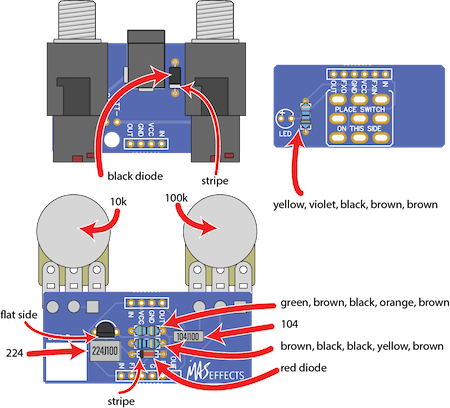
Check each of the characteristics labeled in the image below to figure out if any of your components are in the wrong spots. Click the image to make it larger if needed.
Specificially we're looking at:
- Resistors: color bands, which indicate the value
- Diodes: color and strip orientation. For future reference, we can usually read the diode part number printed on its body. In our case we only have 2 and they're different types, so it's easy to tell them apart.
- Potentiometers: value printed on the front of them
- Capacitors (box film type): the first 3 numbers of the code printed on top of it. For this circuit we can also see one is larger than the other.
- Transistor: orientation as indicated by its flat face. For future reference, if we had multiple types of transistors we might also need to read the part number printed on them
Removing Misplaced Components
Clean and tin your soldering iron tip, then put some extra solder on it. Use the blob of solder to heat up one or both pads on the misplaced component while pulling it from the other side.
Resistors and diodes can be easily lifted one lead and one pad at a time.
Capacitors sometimes are easier to remove if you can use a large blob of solder to heat both pads.
Replacing Components
After removing the incorrect component, you'll now need to replace it with the correct one. The thing that makes this tricky is the pad is probably filled with solder.
Option A (recommended): Secure the PCB sideways at a right angle from the table so you can access both sides. The blue putty from your practice kit should work, but have a friend help you if needed.
Heat the pad from one side while pushing the component through the other.
Do the same for the other pad. You may need to trim the other lead fairly short to make it easier to insert.
After the component is in place, reheat each joint and add a bit more solder to add flux and ensure a good bond.
Option B (advanced): If you have a desoldering pump, you can clean out the pad first. Press in the plunger on your pump. Just as "Option 1", secure the PCB at a right angle. Heat the pad on one side, place the pump over the other, then push the button to suck solder out of the hole. You may need to do this a few times. When you have the hole cleared out you can insert the correct component and solder it.
Some people online will recommend using a wick or braid for desoldering, but it's likely to cause you more problems than it's worth. They're fine for removing surface solder, but don't do a good job of removing solder from the inside of the hole.
Not the Problem?
If that wasn't the issue, visit our forum and provide some pictures and details and we'll help you figure out what's going on.

